Session 121
Understanding UIKit Rendering
个人感觉是WWDC 2011里比较精品的Session,强烈建议各位同学反复看几遍视频,可以了解到许多iOS的实现机制
提要
- UIView and CALayer
- CATransaction and when views get rendered
- Quality and Performance
- Clipping and masking
- Edge anti-aliasing
- Group opacity
- Shadows
UIView and CALayer
Geometry
iPhone 4
UIKit 左上为原点,320 x 480, 横屏原点不变 CoreAnimation 左上为原点,640 x 960
iPad 2
UIKit 左上原点 768 x 1024 CoreAnimation 左下为原点 1024 x 768
关于坐标问题直接参看官方文档就可以了
Drawing
- view.layer.contents
- UIImageView
- drawRect
参考Practical Drawing for iOS Developers
UIImageView 与 drawRect 对比
放大一个图片,drawRect会占用更多内存,UIImageView只占原始图片所占内存,没有额外开销 用一个基础图片(tile)填充一个更大的区域,drawRect同样占用更多内存,UIImageView会在性能与最小内存占用之间选择一个平衡点(将多个tile拼成一个大一些的tile)
CATransaction
转换在runloop结束时生效
Performance
Avoid Offscreen Rendering
“正常"的渲染都直接在当前可视区域进行 屏幕外渲染,让显卡指向一个屏幕外的内存,alloc那段内存并开始绘图,渲染结束后,显卡指向主屏幕,使用之前在屏幕外渲染来在屏幕内绘图,这个过程需要消耗额外的内存,显卡从一个buffer切换到另一个buffer也需要消耗额外的时间,还需要刷新缓冲区,所以在屏幕内的和屏幕外的buffer之间切换代价是很昂贵的。 由于CoreAnimation是逐帧渲染的,所以屏幕外的渲染将会带来极大的开销, 每次屏幕刷新都会有屏幕外的渲染发生,比如一个scrollView,每次scroll的时候,都会在屏幕内进行一些渲染,屏幕外进行一些渲染,然后又将屏幕外的绘制到屏幕内。
Layer Rasterization
这个算是offscreen rendering的一种解决方法吧,屏幕外的渲染会被缓存起来,这样就不用每次都重新绘制一下屏幕外的buffer. ([CALayer setShouldRasterize:])
使用这个特性要保证你的内容是固定不变的,因为如果是个变化的内容,那么每一帧的内容都会与前一帧不同,缓存不能被重复利用,反而影响了性能。
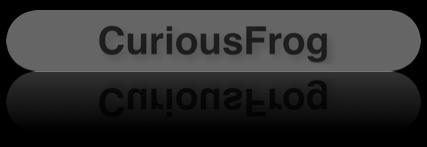
比如要实现图中所示效果

Clipping and Masking
这里有两个技术点,一是圆角的实现,我们可以直接用CALayer的cornerRadius来达到这个效果,虽然很方,但是效率很低。二是倒影的实现,实现倒影的方法是首先取得上半部分原始View hierarchy的一个副本,y轴翻转绘制在下面,然后根据剃度来设置mask,但是这个mask开销是很大的,一方面要对整个View hierachy进行操作,另一方面需要进行Offscreen Render。
下面的方法效率都比较低,虽然很方便 * [CALayer cornerRadius] * [CALayer mask] * [UIView clipsToBounds] 或 [CALayer masksToBounds]
一些Trick * [CALayer contentsRect] 设置需要渲染的范围,本例中并不适用。 * [UIView drawRect:] 预先渲染好来防止每一帧都进行渲染 * Transparent overlay 比如圆角就可以通过覆盖黑色来让它看起来是圆的,但是本例中还要看到圆角后面的内容,所以不采用
Group Opacity
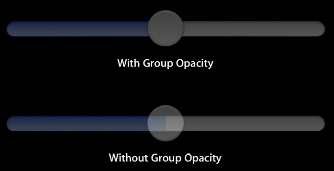
设置Group Opacity和没设置的区别

可以通过一下几个方法实现: * 在Info.plist里设置UIViewGroupOpacity键值 这样就又会产生offscreen rendering * 在drawRect:里预先渲染 * 设置shouldRasterize为YES
Shadowed text
使用CALayer的shadow属性很方便,但是开销也很昂贵
Demo
首先给出检测offscreen rendering的方法:使用Instruments的Core Animation模板,选中Color Offscreen-Rendered Yellow就可以让所有的Offscreen rendering都染成黄色
首先使用
UIBezierPath *capsulePath = [UIBezierPath bezierPathWithRoundedRect:myBounds cornerRadius:myBounds.size.height / 2.0];
[[UIColor grayColor] set];
[capsulePath fill];
来绘制圆角的背景,免去setCornerRadius的开销。
接着使用
CGContextSetShadow(context, CGSizeMake(3.0f, 3.0f), 10.0f);
CGContextSetShadowWithColor(context, CGSizeMake(3.0f, 3.0f), 10.0f, [UIColor colorWithWhite:0 alpha:.4].CGColor);

[[UIColor blackColor] set];
[_labelTitle drawInRect:titleFrame withFont:[UIFont boldSystemFontOfSize:28]];
来代替setShadowOffset: 和 setShadowColor:,这里注意一点,CoreGraphics在你执行绘制的代码后立即就会进行绘制,所以要在绘制之前先把属性设置好;而Core Animation在Transaction commit之后才开始渲染,所以属性可以在之后设置。
倒影的绘制,预先绘制成一个图片来防止逐帧渲染
if (_isReflected) {
    // create mask image

    UIGraphicsBeginImageContext([self bounds].size);
    CGColorSpaceRef deviceGray = CGColorSpaceCreateDeviceGray();
    CGFloat locations[2] = {1.0, 0.0);
    NSArray *colors = [NSArray arrayWithObjects:(id)[[UIColor colorWithWhite:0.0 alpha:0.0] CGColor], (id)[[UIColor colorWithWhite:0..0 alpha:0.5] CGColor], nil];
    CGGradientRef gradient = CGGradientCreateWithColors(deviceGray, (CFArrayRef)colors, locations);

    CGContextDrawLinearGradient(UIGraphicsGetCurrentContext(), gradient, CGPointMake(0, 0), CGPointMake(0, [self bounds].size.height), 0);
    CGGradientRelease(gradient);
    CGColorSpaceRelease(deviceGray);
    CGImageRef maskImage = [UIGraphicsGetImageFromCurrentImageContext() CGImage];
    UIGraphicsEndImageContext();

    CGContextClipToMask(context, myBounds, maskImage);
}
Edge Antialiasing
抗锯齿的实现有下面两个方法
- Info.plist里设置UIViewEdgeAntialiasing键值 开销很大
- 用一个像素的边来模拟
代码如下:
- (UIImageView *)createImageViewForImage:(UIImage *)image
{
    UIImageView *imageView = [[UIImageView alloc] initWithImage:image];
    [imageView setContentMode:UIViewContentModeScaleAspectFit];

    //Add a shadow around the image.
    [[imageView layer] setShadowOffset:CGSizeMake(10, 10)];
    [[imageView layer] setShadowColor:[[UIColor blackColor] CGColor]];
    [[imageView layer] setShadowOpacity:.5];

    //Rotate the image by some small random angle.
    [imageView setTransform:CGAffineTransformMakeRotation((((float)random() / RAND_MAX) * MAX_ROTATION) - MAX_ROTATION / 2)];

    //Rather than using Core Animation's edge antialiasing, which requires an off-screen rendering pass, we'll draw our image int own image with an empty 1px border on each side. That way, when it's rotated, the edges will appear smooth because the outermost pixels of the original image will be sampled with the clear pixels in the outer border we add. This sampling is much faster but not as high-quality.

    CGSize imageSizeWithBorder = CGSizeMake([image size].width + 2, [image size].height + 2);
    UIGraphicsBeginImageContext(imageSizeWithBorder);
    // The image starts off filled with clear pixels, so we don't need to explicitly fill them here.
    [image drawInRect:(CGRect){{1,1}, [image size]}];
    [imageView setImage:UIGraphicsGetImageFromCurrentImageContext()];
    UIGraphicsEndImageContext();

    // We no longer need CA's edge antialiasing on this layer
    [[imageView layer] setEdgeAntialiasingMask:0];

    return imageView;
}
阴影绘制:
- (void)layoutImageView:(UIImageView *)imageView inFrame:(CGRect)celFrame withAnimationDuration:(NSTimeInterval)duration
{
    // The image view may be rotated, so set its frame in terms of the identity transform and then reapply the transform.
    CGAffineTransform imageViewTransform = [image View transform];
    [imageView setTransform:CGAffineTransformIdentity];
    [imageView setFrame:CenteredRectInRect(CGRectMake(0, 0, [imageView image].size.width, [imageView image].size.height), celFrame)];
    [imageView setTransform:imageViewTransform];

    // Save Core Animation a pass to figure out where the transparent pixels are by informing it explicitly of the contents's shape.
    CGPathRef oldPath = CGPathRetain([[imageView layer] shadowPath]);
    [[imageView layer] setShadowPath:[[UIBezierPath bezierPathWithRect:[imageView bounds]] CGPath]];

    // Since the layer's delegate (its UIView) will not create an action for this change (via the CALayerDelegate method actionForLayer:forKey:), we must explicitly create the animation between these values.
    CABasicAnimation *pathAnimation = [CABasicAnimation animationWithKeyPath:@"shadowPath"];
    [pathAnimation setFromValue:(id)oldPath];
    [pathAnimation setToValue:(id)[[imageView layer] shadowPath]];
    [pathAnimation setDuration:duration];
    [pathAnimation setTimingFunction:[CAMediaTimingFunction functionWithName:kCAMediaTimingFunctionEaseInEaseOut]];
    [pathAnimation setRemovedOnCompletion:YES];

    [[imageView layer] addAnimation:pathAnimation forKey:@"shadowPath"];
    CGPathRelease(oldPath);
}
以上就是这个session中个人觉得比较精髓的部分了,一些地方用中文表达的也不是太好,代码都是手打的,难免有错误,如有问题还请留言指正 对这篇文章涉及的内容感兴趣的同学也看看这篇文章(在墙外,如有需要我可以帮忙做个pdf传上来)
—以上—

